
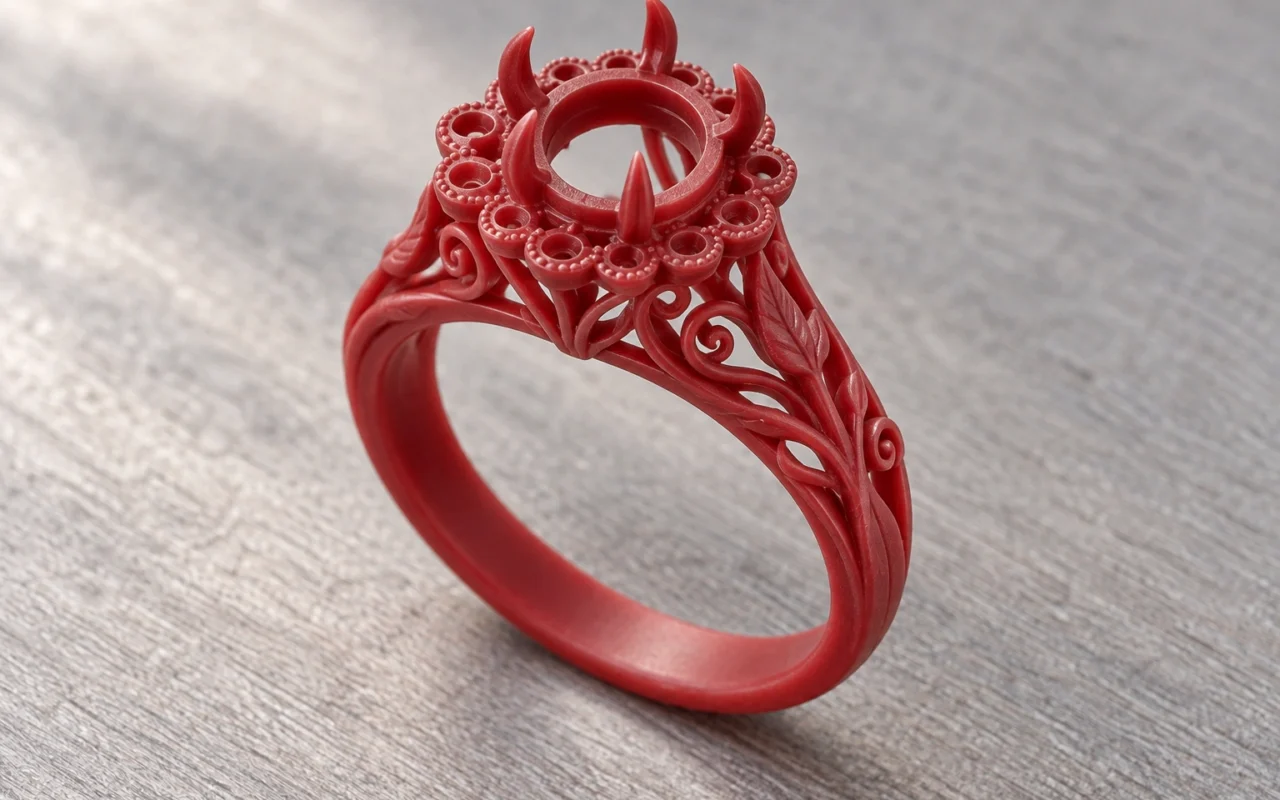
The route described here prints a wax ring model first and then casts it in metal. The printed shape is an intermediate production item; casting, finishing, stone setting and inspection turn it into jewelry ready for delivery.
Follow the ring’s main features: its inner circumference determines fit, the shank supports the structure, the setting and prongs hold the stone, and decorative surfaces express the design. Each needs different checks as it moves from CAD to wax and metal.
1 Start with ring size and overall construction
Before modeling, agree on the ring-sizing standard and measurement method. A size number alone can be ambiguous across systems. Record the inner diameter, inner profile, band width and the customer’s fit requirements together.
For a center-stone ring, obtain the stone’s actual dimensions and shape. Stones of equal weight can have different pavilion profiles, girdles and heights. Assess the seat against the stone and setting method, and consider stone clearance, head height and the head-to-shank connection.
GIA’s jewelry CAD/CAM course combines proportion with manufacturing constraints. Ring designers must translate appearance into workable connections and dimensions, beyond an attractive front outline.
Plain, textured and densely stone-set shanks need different attention. During model review, identify surfaces whose appearance must be preserved, areas that will be worked, and details that need a trial sample.
2 Turn the approved CAD model into a print job
The master CAD file retains editable design information; the exported print file communicates geometry. Recheck units, overall dimensions, surfaces and details after export so mesh conversion has not visibly changed holes, prongs or lettering.

Production geometry may include compensation or machining allowance. Record the purpose, supporting values and responsible person, separating finished requirements from manufacturing dimensions. Unrecorded adjustments at both design and printing stages can duplicate compensation.
Do not resize a ring by simply scaling the entire model. Scaling also changes the seat and prongs while the stone remains the same size. Modify the relevant geometry, then recheck head connections, ornament spacing and local cross-sections.
Keep the style reference, size, version and quantity on the job sheet. Identify similar-looking sizes separately instead of relying on sight. Once the file is confirmed, prepare orientation, supports and build layout.
3 Inspect the wax ring after printing and support removal
In systems using build wax and support wax, one forms the ring geometry while the other temporarily supports areas that need it. They may still be together when printing ends; post-processing exposes previously covered surfaces and gaps for inspection.

Support removal must follow the equipment and material procedures. Fine prongs, lettering and thin connections can be damaged during handling or cleaning, so choose suitable support and inspection methods. A completed print job does not automatically qualify the whole batch.
Check five areas: continuity of the ring, distortion of its inner profile, preservation of seats and prongs, continuity of ornament, and clearance of openings. Measure critical dimensions by the agreed method without applying force that distorts the wax.
Wax models support geometric observation and process checks; they cannot validate the wear strength of a metal ring. For repeated fitting, assess an appropriate prototype material and its intended use separately.
4 Transfer the wax shape into metal
In a common jewelry investment process, inspected wax patterns are attached to a gating system, placed in a flask and surrounded by investment. After the mold forms, the wax is removed to leave cavities that molten metal fills.
Ransom & Randolph’s jewelry casting process explains the relationship between wax patterns, trees, investment, wax removal and cast metal. Here the focus is the ring’s changing state; the foundry selects investment materials and procedures for the alloy and project.
| Physical state | What you have | What to verify |
|---|---|---|
| Wax ring pattern | Positive form for making the mold | Geometry, dimensions, integrity and cleaning |
| Wax tree | Patterns connected to a gating system | Connections, casting arrangement and style identification |
| Investment mold | Cavities for metal after wax removal | Mold condition suited to materials and pouring |
| Cast ring blank | Metal ring with sprue or finishing work remaining | Completeness, critical dimensions and working areas |
| Finished ring | Jewelry after the agreed operations | Size, setting, surface and final appearance |
Printing supports and casting sprues serve different purposes. Casting personnel should review the ring’s tree position, metal entry and connections. Supports created during print preparation are not a completed gating design.
5 Finish the casting and check dimensions again
After casting, cut off sprues and dress the connections as specified, then grind, polish and set stones. Consider tool access to inner surfaces, texture and seats during design. Difficult finishing can compromise details already formed.

A correct wax dimension does not guarantee every finished ring dimension. The mold, alloy and subsequent work all contribute. ORNL’s investment-casting dimensional study examines thermomechanical behavior in wax, shells and alloys, placing compensation in specific process conditions. Its industrial-alloy experiments do not establish a universal shrinkage rate for jewelry rings.
Return to finished requirements: verify size against the agreed standard, inspect the center stone and prongs, assess the head-to-shank connection and check decoration after surface finishing. Record checks before and after setting separately.
If the band is out of size but the seat is correct, or the reverse, trace those dimensions individually. Calling every discrepancy overall shrinkage can hide local machining or distortion.
Measurement records should identify wax model, casting or finished item, together with datum and method. Do not mix inner-diameter readings from different states. With multiple people or suppliers, agree on measurement locations and release criteria first; retain original results before discussing adjustments for the next run.
6 Keep a ring record for repeat orders
The tracking sheet below is a blank template connecting design requirements with wax-model and finished-item checks.
| Record | Information to keep |
|---|---|
| Design identity | Style reference, CAD version, approval date and files |
| Sizing requirements | Standard, target dimensions and measurement method |
| Stone information | Measured dimensions, profile and proposed setting method |
| Manufacturing adjustments | Compensation, allowances and responsible person |
| Wax checks | Results for band, seat, fine prongs and ornament |
| Casting and final checks | Casting deviations, finishing record, final dimensions and setting condition |
| Repeat-order changes | Changes to stones, size, alloy or surface requirements |
Photographs aid visual identification, but keep written records of critical dimensions and manufacturing adjustments. When a repeat order changes stones or sizes, create a new version before deciding which process conditions remain applicable.
Frequently asked questions
Can you print a gold ring directly?
Direct metal additive manufacturing is another route, requiring suitable equipment, metal feedstock and post-processing. The wax printer discussed here produces casting patterns; metal is formed during the later casting stage.
Why inspect both the wax model and the finished ring?
Wax inspection checks readiness for handover; post-casting inspection evaluates metal formation; final inspection checks fit, setting and surface requirements. Each stage examines a different object and reveals different issues.
What should I prepare for a ring sample evaluation?
Provide the approved version, sizing standard, measured stone information and critical-feature requirements. Specify whether delivery should be wax models, cast blanks or finished jewelry, so inspections and subsequent operations can be arranged.